네이버 부스트캠프에서 gist를 생성한 후에 나의 디렉토리로 clone하여 미션을 매일 수행해야한다. 그러기 위해서 gist 접속 -> secret gist 생성 -> README.md 생성 -> 나의 디렉토리로 git clone 까지 해야한다. 매일 이런 반복 작업을 하기가 귀찮아서 JS 공부도 할겸 자동화 코드를 만들기로 했다.
필요한 라이브러리
import readline from "readline";
import { Octokit } from "@octokit/rest";
import { exec } from "child_process";
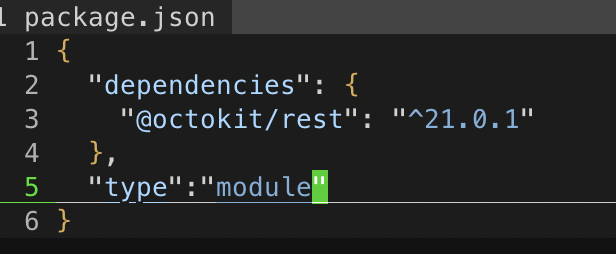
import fs from "fs";이전에는 항상 require("readline") 모듈을 가져왔었다. 하지만 이번에 사용할 모듈인 "@octokit/rest" 와 "child_process" 모듈이 ES 모듈 형식으로 되어있기 때문에 require를 사용할 수 없다. 이걸 해결하기 위해 node_moudels 디렉토리가 있는 프로젝트 루트에 pakage.json파일에 "type" : "module" 을 추가해줘야 한다. (다른 방법으로는 파일 확장자를 .mjs 로 바꾸는 방법이 있다.)
라이브러리 설명을 조금 하자면
- "@octokit/rest": github API와 상호작용하기 위한 라이브러리
- "child_process": 외부 셀 명령을 실행하기 위한 모듈
- "fs": 파일 시스템 작업을 위한 모듈
- "readline": 데이터를 읽기 위해 인터페이스를 제공하는 모듈
그리고 import를 할 때 {} 를 사용하여 가져오는 경우가 보인다. {} 를 사용하는 경우는 사용하는 모듈에서 특정 내보낸(exported) 부분만 가져온다. 즉, { exec } 는 child_process 에서 내보내는 여러 객체 또는 함수 중 하나이다.
파일명 input 입력 받기
readline 라이브러리를 사용하여 clone할 파일명을 콘솔창에서 입력으로 받는 방법이다.
const rl = readline.createInterface({
    input:process.stdin,
    output:process.stdout
});

let file;

rl.on("line", (line) =>{
    console.log("write like day00")
    file = line;
    rl.close();
    }
).on("close", () => {
    cloneGist(file);
      // process.exit();
})
동작 순서는 node main.js 로 파일을 실행하면 "write like day00" 문구가 보이고 만들고자 하는 파일명을 입력하면 된다. "line"과 "close"는 rl.on에서 쓰이는 이벤트이다.
- line : 입력받은 값을 한 줄씩 읽어 문자열 타입으로 전달하는 이벤트
- close : 더 이상 입력값이 없을 경우에 해당하는 이벤트
그리고 각각의 이벤트와 같이 전달되는 콜백함수들의 용도는 다음과 같다. - rl.close() : 인터페이스를 종료하여 무한히 입력받음을 방지.
- process.exit() : 프로세스를 종료
하지만 이 코드에서는 process.exit()를 사용하지 않는다. 이유는 뒤에서 설명할 것이다.
function cloneGist
const token = "개인 토큰";

async function cloneGist(fileName) {
    const octokit = new Octokit({
        auth: token
    });

    try {

        const response = await octokit.request('POST /gists', {
            description: 'description 내용',
            public: false,
            files: {
                'README.md': {
                    content: 'readme 내용'
                }
            },
            headers: {
                'X-GitHub-Api-Version': '2022-11-28'
            }
        });

        const gistUrl = response.data.git_pull_url;
        console.log('Gist created:', gistUrl);

        // Create a directory for the Gist
        const dir = `./${fileName}`;
        if (!fs.existsSync(dir)) {
            fs.mkdirSync(dir);
        }

        // Clone the Gist
        exec(`git clone ${gistUrl} ${dir}`, (err, stdout, stderr) => {
            if (err) {
                console.error('Error cloning gist:', err);
                return;
            }
            console.log('Gist cloned successfully:', stdout);
        });
    } catch (error) {
        console.error('Error creating gist:', error);
    }
}
github에서 token을 받고 이 코드에 사용해주면 된다.
const response = await octokit.request('POST /gists', {
  description: 'description 내용',
  public: false,
  files: {
    'README.md': {
      content: 'readme 내용'
    }
  },
  headers: {
    'X-GitHub-Api-Version': '2022-11-28'
  }
});
그리고 이 부분은 github docs에서 제공해주는 API 사용 방법에 나와 있는 내용을 가져온 것이다. https://docs.github.com/ko/rest/gists/gists?apiVersion=2022-11-28#create-a-gist
이 코드에서 secret gist가 생성이 되고 해당 정보를 response에 담는다.
const gistUrl = response.data.git_pull_url;
exec(`git clone ${gistUrl} ${dir}`, (err, stdout, stderr) => {
  if (err) {
    console.error('Error cloning gist:', err);
    return;
  }
  console.log('Gist cloned successfully:', stdout);
});
response에서 data.git_pull_url을 사용하여 방금 생성한 secrit gist http 주소를 가져오고 exec 를 사용하여 console에 자동 입력되게 만든다. 그러면 방금 생성한 gist를 나의 디렉토리에 바로 clone할 수 있다.
왜 process.exit() 를 사용하지 않는가.
파일을 실행해보면서 가장 헤맸던 부분이다. 분명 코드에는 문제가 없는 것 같은데 파일을 실행하고 input을 넣어도 cloneGist 함수를 읽지 못하고 끝나버린다. 이유는 비동기함수이기 때문이다. async function 안에 awiat 로 생성된 비동기 함수가 완료되기 전에 process.exit()가 파일 실행을 종료시키기 때문이다. 그래서 process.exit()를 사용하지 않아도 되고, then() 을 사용하여 비동기 함수가 끝난 이후에 process.exit()가 실행되게 만드는 방법도 있다.
최종 코드
import readline from "readline";
import { Octokit } from "@octokit/rest";
import { exec } from "child_process";
import fs from "fs";

const rl = readline.createInterface({
    input:process.stdin,
    output:process.stdout
});

const token = "your_token";
let file;

rl.on("line", (line) =>{
    console.log("write like day00")
    file = line;
    rl.close();
    }
).on("close", () => {
    cloneGist(file);
})

async function cloneGist(fileName) {
    const octokit = new Octokit({
        auth: token
    });

    try {

        const response = await octokit.request('POST /gists', {
            description: "description 내용",
            public: false,
            files: {
                'README.md': {
                    content: 'readme 내용'
                }
            },
            headers: {
                'X-GitHub-Api-Version': '2022-11-28'
            }
        });

        const gistUrl = response.data.git_pull_url;
        console.log('Gist created:', gistUrl);

        // Create a directory for the Gist
        const dir = `./${fileName}`;
        if (!fs.existsSync(dir)) {
            fs.mkdirSync(dir);
        }

        // Clone the Gist
        exec(`git clone ${gistUrl} ${dir}`, (err, stdout, stderr) => {
            if (err) {
                console.error('Error cloning gist:', err);
                return;
            }
            console.log('Gist cloned successfully:', stdout);
        });
    } catch (error) {
        console.error('Error creating gist:', error);
    }
}'Github' 카테고리의 다른 글
| [Github] VScode에서 github으로 파일 올리기 심화과정 (0) | 2023.06.30 |
|---|---|
| [Github] VScode에서 github로 파일 올리기 (0) | 2023.06.30 |
| [Github] vscode와 github 연동하기 (0) | 2023.03.03 |
| [Github] github 일단 시작해보기 (0) | 2023.02.20 |


